
Key Takeaways
| What You Will Learn | How It Helps Your Plant & Kitchen |
| Harvesting Secret | Understand that morning picking unlocks a hidden flavor boost you shouldn’t miss. |
| Moisture Control | Master one simple cleaning step to save your batch from a dark fate. |
| Air-Drying Method | Learn that slow Preservation creates a vibrant finish most people ruin. |
| Oven-Drying Hack | A sneaky oven trick prevents your leaves from burning. |
| Storage Rules | Understanding where you store whole leaves holds the key to year-long freshness. |
Learning how to dry basil at home is the best way to preserve its fresh aroma, essential oils & rich flavor for year-round use.
Whether you prefer air-drying or quick low-heat oven methods, proper drying techniques keep your harvested leaves crisp & mold-free.
The Golden Rule of Timing: Picking Basil at Its Peak
Getting the absolute best flavor from dried basil starts long before you ever turn on an oven or hang up a bundle of stems in your kitchen.
The entire process hinges on one critical factor: picking your leaves when their natural essential oils reach their peak concentration.
If you harvest basil too early or wait until your plant begins to decline, the leaves will lose that iconic sweet & pepper-spiced aroma that makes basil a staple in home cooking.
1. Why You Must Harvest Before Flowers Show Up
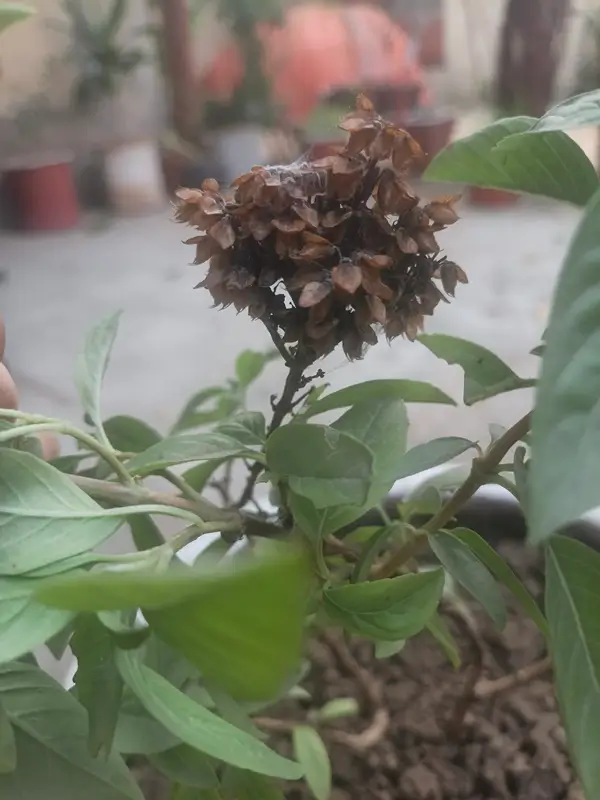
Basil plants undergo a major chemical shift once they start preparing to produce seeds.
When small white or purple flower buds form at the tops of the stems_plants redirects its energy & nutrients away from leaf production & straight into flowering.
As a result, older foliage becomes tough, fibrous & noticeably bitter.
To capture that vibrant summer sweetness & you need to harvest heavily right before those flower spikes show up.
If you notice tiny buds starting to form, pinch them off immediately this signals plant to keep putting its energy into full & tender leaf growth.
2. The Magic Morning Window for Maximum Flavor
The clock plays a subtle yet powerful role in preserving volatile & aromatic oils.
During heat of the day – sunlight causes moisture to evaporate from the plant which dilutes strength of those essential oils.
The absolute best time to harvest basil is early morning & right after the morning dew has dried off leaves but before midday sun warms up the garden bed.
At this hour & leaves are fully hydrated, crisp & packed with maximum essential oil density.
3. Gentle Handling: Preserving Fragrant Oils
Once you gather your stems – treat the leaves gently to avoid bruising them – as crushed leaves release their aromatic oils prematurely into air instead of keeping them locked inside for storage.
Wash your freshly picked basil under cool tap water to remove dust & garden pests.
Most critical step before moving to dehydration is drying leaves completely.
Trapped surface moisture creates a perfect environment for blackening & mold growth during drying process.
Gently pat the leaves dry using soft kitchen towels – use a salad spinner on a low setting & let them sit in a well-ventilated shade for a few minutes until every drop of water is dry.
Prep & Washing: The Secret to Stopping Mold in Its Tracks
Properly washing & drying your freshly harvested basil is a small step that makes a massive difference in final quality of your dried herbs.
While it might be tempting to skip washing or quickly pat leaves before drying them – leaving behind hidden dirt or surface moisture can completely ruin your batch.
Taking a few extra minutes to clean & thoroughly dry your foliage ensures bright color, crisp texture & pure flavor.
1. Cold-Water Cleaning: Protecting Sensitive Oils
Freshly picked basil leaves carry invisible garden dust, tiny insects & fine soil particles – you should remove them before preservation.
Always wash your plant using cold water or submerge leaves briefly in a bowl of clean & cool water.
Swirl them softly with your fingers to loosen any debris without crushing plant tissues.
Avoid using warm & hot water – as heat immediately causes leaves to wilt & release their fragrant volatile oils prematurely into the sink instead of keeping them sealed inside for storage.
2. Drying Surface Water to Prevent Black Leaves
The absolute biggest enemy of successful herb dehydration is excess surface moisture.
If you attempt to air-dry or oven-dry leaves that are still wet from washing – the trapped water creates a damp & humid environment that promotes mold growth, black rot & a sour, off-putting smell.
Moisture also causes the leaves to turn dark brown or black during the drying process instead of keeping their rich green hue.
To get rid of every drop of surface water – lay the washed leaves out in a single layer over thick, clean cloth towels & paper towels.
Gently press another dry towel on top to soak up the water droplets without tearing delicate foliage.
If you have a salad spinner, placing the leaves inside & spinning them on a low, gentle setting works exceptionally well to lift away moisture quickly.
Allow cleaned leaves to rest in a well-ventilated & shaded spot for about ten to fifteen minutes – until they feel completely dry before moving on to dehydration phase.
Traditional Air-Drying: The Zero-Heat Flavor Preserver
Natural air-drying is widely considered ultimate traditional method for preserving herbs because it relies entirely on ambient room temperature rather than harsh oven heat.
By allowing moisture to evaporate gradually over time, you protect delicate volatile oils & essential compounds that give basil its signature sweet & slightly spicy aroma.
This slow preservation drying process also retains the deep emerald green color of the leaves – preventing them from scorching or turning dark brown.
While it requires patience compared to modern appliances, air-drying yields a highly potent & premium-quality dried herb.
1. How to Bundle & Tie Stems Like a Pro
Properly grouping your stems is the foundational step for successful air-dehydration. Creating bundles that are too dense or thick will trap humidity in the center, leading to rot before drying process is complete.
-
Keep Bundles Small: Gather four to six washed & surface-dried basil stems together. Small bundles ensure that fresh air reaches every individual leaf.
-
Tie Stems Securely: Fasten stem bases tightly using durable twine, cotton string & a flexible rubber band.
-
Use Self-Adjusting Bands: Rubber bands are highly recommended because stems lose moisture & shrink over time – rubber bands naturally tighten around them & prevent loose stems from slipping out & falling to the floor.
2. The Paper Bag Hack to Block Dust & Light
Exposing drying herbs to ambient room elements like floating kitchen dust, grease particles & direct light can significantly degrade their final quality & shelf life.
-
Create Ventilated Enclosures: Take a small, clean paper bag & punch several tiny holes along its sides using scissors to maintain continuous air circulation.
-
Enclose Bundle: Slip basil bundle upside down into paper bag – gather top opening around the tied stems & tie it shut.
-
Shield & Catch: The paper bag acts as a protective shield against dust & light – while also acting as a basket to catch any brittle leaves that happen to drop off naturally during dehydration.
3. Setting Up the Perfect Drying Spot
The climate in which you hang your basil bundles plays an important role in your leaves dry turn sour & moldy.
-
Right Spot: Place your bundles upside down in a warm, dark & well-ventilated location such as a dry pantry or a warm & spare room.
-
Avoid Humidity Zones: Never hang drying herbs in humid areas like bathrooms, near a kitchen sink or directly above a cooking stove where steam frequently accumulates.
-
Block Direct Sunlight: Keep drying bundles far away from direct sunlight. Ultraviolet rays break down essential oils & bleach natural green leaves in dull &brown c olor.
-
Test for Complete Dryness: Allow leaves to air dry naturally over a period of one to two weeks. Basil is fully dry when leaves feel paper thin, crisp & crumble between your fingertips
Low-Heat Oven Drying: Fast Results Without Burning
When you live in a high-humidity environment or simply cannot wait two weeks for air-drying – using a kitchen oven provides an efficient alternative.
The main challenge with oven drying is ensuring that you remove moisture completely without scorching & cooking out the plant’s essential aromatic compounds.
By maintaining strict control over temperature & air circulation – you can preserve a full harvest of basil in less than an hour.
1. Prepping Baking Sheets for Even Airflow
Proper layout on baking tray is essential for even heat distribution.
If leaves are piled on top of one another & trapped steam will cause them to cook rather than dehydrate.
-
Paper Lining: Always line your baking sheet with a sheet of natural parchment paper. This creates a non-reactive barrier – prevents delicate leaves from sticking to hot metal surfaces.
-
Single Layer Spacing: Spread individual washed leaves across the tray in a single layer. Ensure that no edges overlap so warm air can circulate freely around every leaf.
2. The Wooden Spoon Trick for Temperature Control
Standard home ovens are designed to bake & roast which means their lowest temperature settings can still be a bit too hot for delicate herbs.
-
Set Lowest Heat: Set your oven to its absolute lowest temperature setting – ideally between 140°F & 170°F (60°C to 75°C).
-
Prop Open Door: Keep oven door cracked open by 1 to 2 inches using a wooden spoon. This allows trapped steam to escape continuously & preventing humidity inside oven cavity.
3. How to Test for Perfect Crispness
Unlike air-drying – oven drying requires continuous attention because herbs can turn from perfectly crisp to burnt within a matter of minutes.
-
Frequent Checks: Bake the leaves for 30 to 45 minutes – checking on them every 10 to 15 minutes to inspect texture & color changes.
-
Testing Crispness: The process is complete when the leaves feel brittle & snap easily under light pressure.
-
Cooling Phase: Remove tray immediately & let the leaves cool completely at room temperature before transferring them into glass storage jars.
Long-Term Storage: Keeping Your Basil Fresh for 12 Months
Drying your basil successfully is only half journey toward building a great home spice collection.
How you handle package & store your fully dehydrated leaves determines – whether they maintain their signature pepper-sweet aroma for up to a year or lose their strength.
Taking time to follow proper storage guidelines protects your hard work & guarantees that every pinch of herb adds vibrant flavor to your dishes.
1. Choosing the Right Jars (Glass vs Plastic)
Type of vessel you select directly impacts on shelf life of your herbs.
Non reactive glass jars with tight silicone & screw-top lids are gold standard for long-term herb preservation.
Glass provides an absolute barrier against ambient air currents & external moisture – ensuring that volatile aromatic oils remain trapped inside the jar.
Synthetic plastics tend to absorb delicate plant oils over time – which not only degrades herb’s flavor profile but can also cause a subtle plastic odor in your harvest.
2. 4 Golden Rules for Infinite Shelf Life
-
Keep Leaves Whole Until Use: Store your dried foliage as whole leaves without crushing them immediately. Crushing breaks open leaf cells & releases air causing flavor to fade.
-
Store in a Dark & Cool Location: Position your sealed glass jars inside a dark pantry, kitchen cupboard & enclosed spice drawer. Exposure to direct sunlight bleaches natural leaf & degrades essential aromatic compounds.
-
Avoid Nearby Heat Sources: Keep storage containers far from heat-generating kitchen appliances – including your cooking stove, dishwasher, oven vents & direct radiator heat.
-
Conduct a First-Week Moisture Test: Inspect your storage jars daily during first seven days after packaging. If you notice tiny water foliage inside glass remove leaves immediately & dehydrate them further to prevent mold growth.
3. Is Your Basil Still Good? The Quick Smell Test
A simple visual check helps you determine if your home-dried basil is still at its peak.
Open the jar &cr ush a small leaf between your fingertips; if a rich, sweet basil scent releases instantly – the batch is still potent.
However, if foliage looks pale grey-brown & produces little to no aroma when rubbed – the essential oils have fully evaporated.
Frequently Asked Questions
What is best way to dry out fresh basil?
The best traditional method to dry fresh basil while preserving its rich aroma & emerald green color is natural air-drying. Group four to six thoroughly washed & dried stems into small bundles - secure them with a rubber band & slip them inside a ventilated paper bag. Hang the bundles upside down in a warm, dark & well-ventilated room away from direct sunlight for one to two weeks. If you live in a high-humidity climate or need faster results, low-heat oven drying at 140°F - 170°F with the oven door propped open works as an effective alternative in under an hour.
Is it better to freeze or dry fresh basil?
Whether you should freeze or dry basil depends on how you plan to cook with it: Freezing is better for raw & fresh applications: Blanching leaves in hot water for a few seconds, shocking them in ice water, & blending them with olive oil before freezing in ice cube trays preserves the bright, sweet & fresh taste. This method is ideal for making pesto, fresh pasta sauces & cold dressings. Drying is better for long-term storage & cooked dishes: Dried basil lasts significantly longer on a spice rack & releases a deeper, warm flavor when simmered in long-cooking recipes like stews, marinara sauces & soups.
Is basil worth drying?
Yes, home-dried basil is absolutely worth quick effort. Commercial store-bought dried basil often sits on supermarket shelves for months - losing its volatile aromatic oils & turning into dull & tasteless brown flakes. Drying your own fresh harvest at home seals in essential oils - preserves pure flavor without added preservatives or anti-caking fillers & helps you save money by storing surplus garden foliage for winter months.
What is the best way to preserve basil?
Overall method depends on your preferred flavor profile & storage duration: Pureeing & Freezing in Oil: Offers highest flavor retention keeping basil tasting practically identical to fresh leaves for up to six months. Traditional Air-Drying: The most effective method for long-term shelf storage & keeping whole leaves flavorful inside glass jars for up to a year without taking up freezer space. Making Compound Herb Butter: Blending chopped basil with butter & freezing it in logs provides a quick, flavorful addition to steaks, seafood & roasted vegetables.